

Click here to download the full-res infographic of the Writer’s Workflow!
I can’t speak for any other writers, but I certainly have writing habits.
Some are great, but others… aren’t.
This post is about those habits, deadlines, goals, and dreams. It’s a monologue about how I am as a writer. I don’t know if it’s helpful for you, but I’d bet you resonate with at least a couple of these truths.
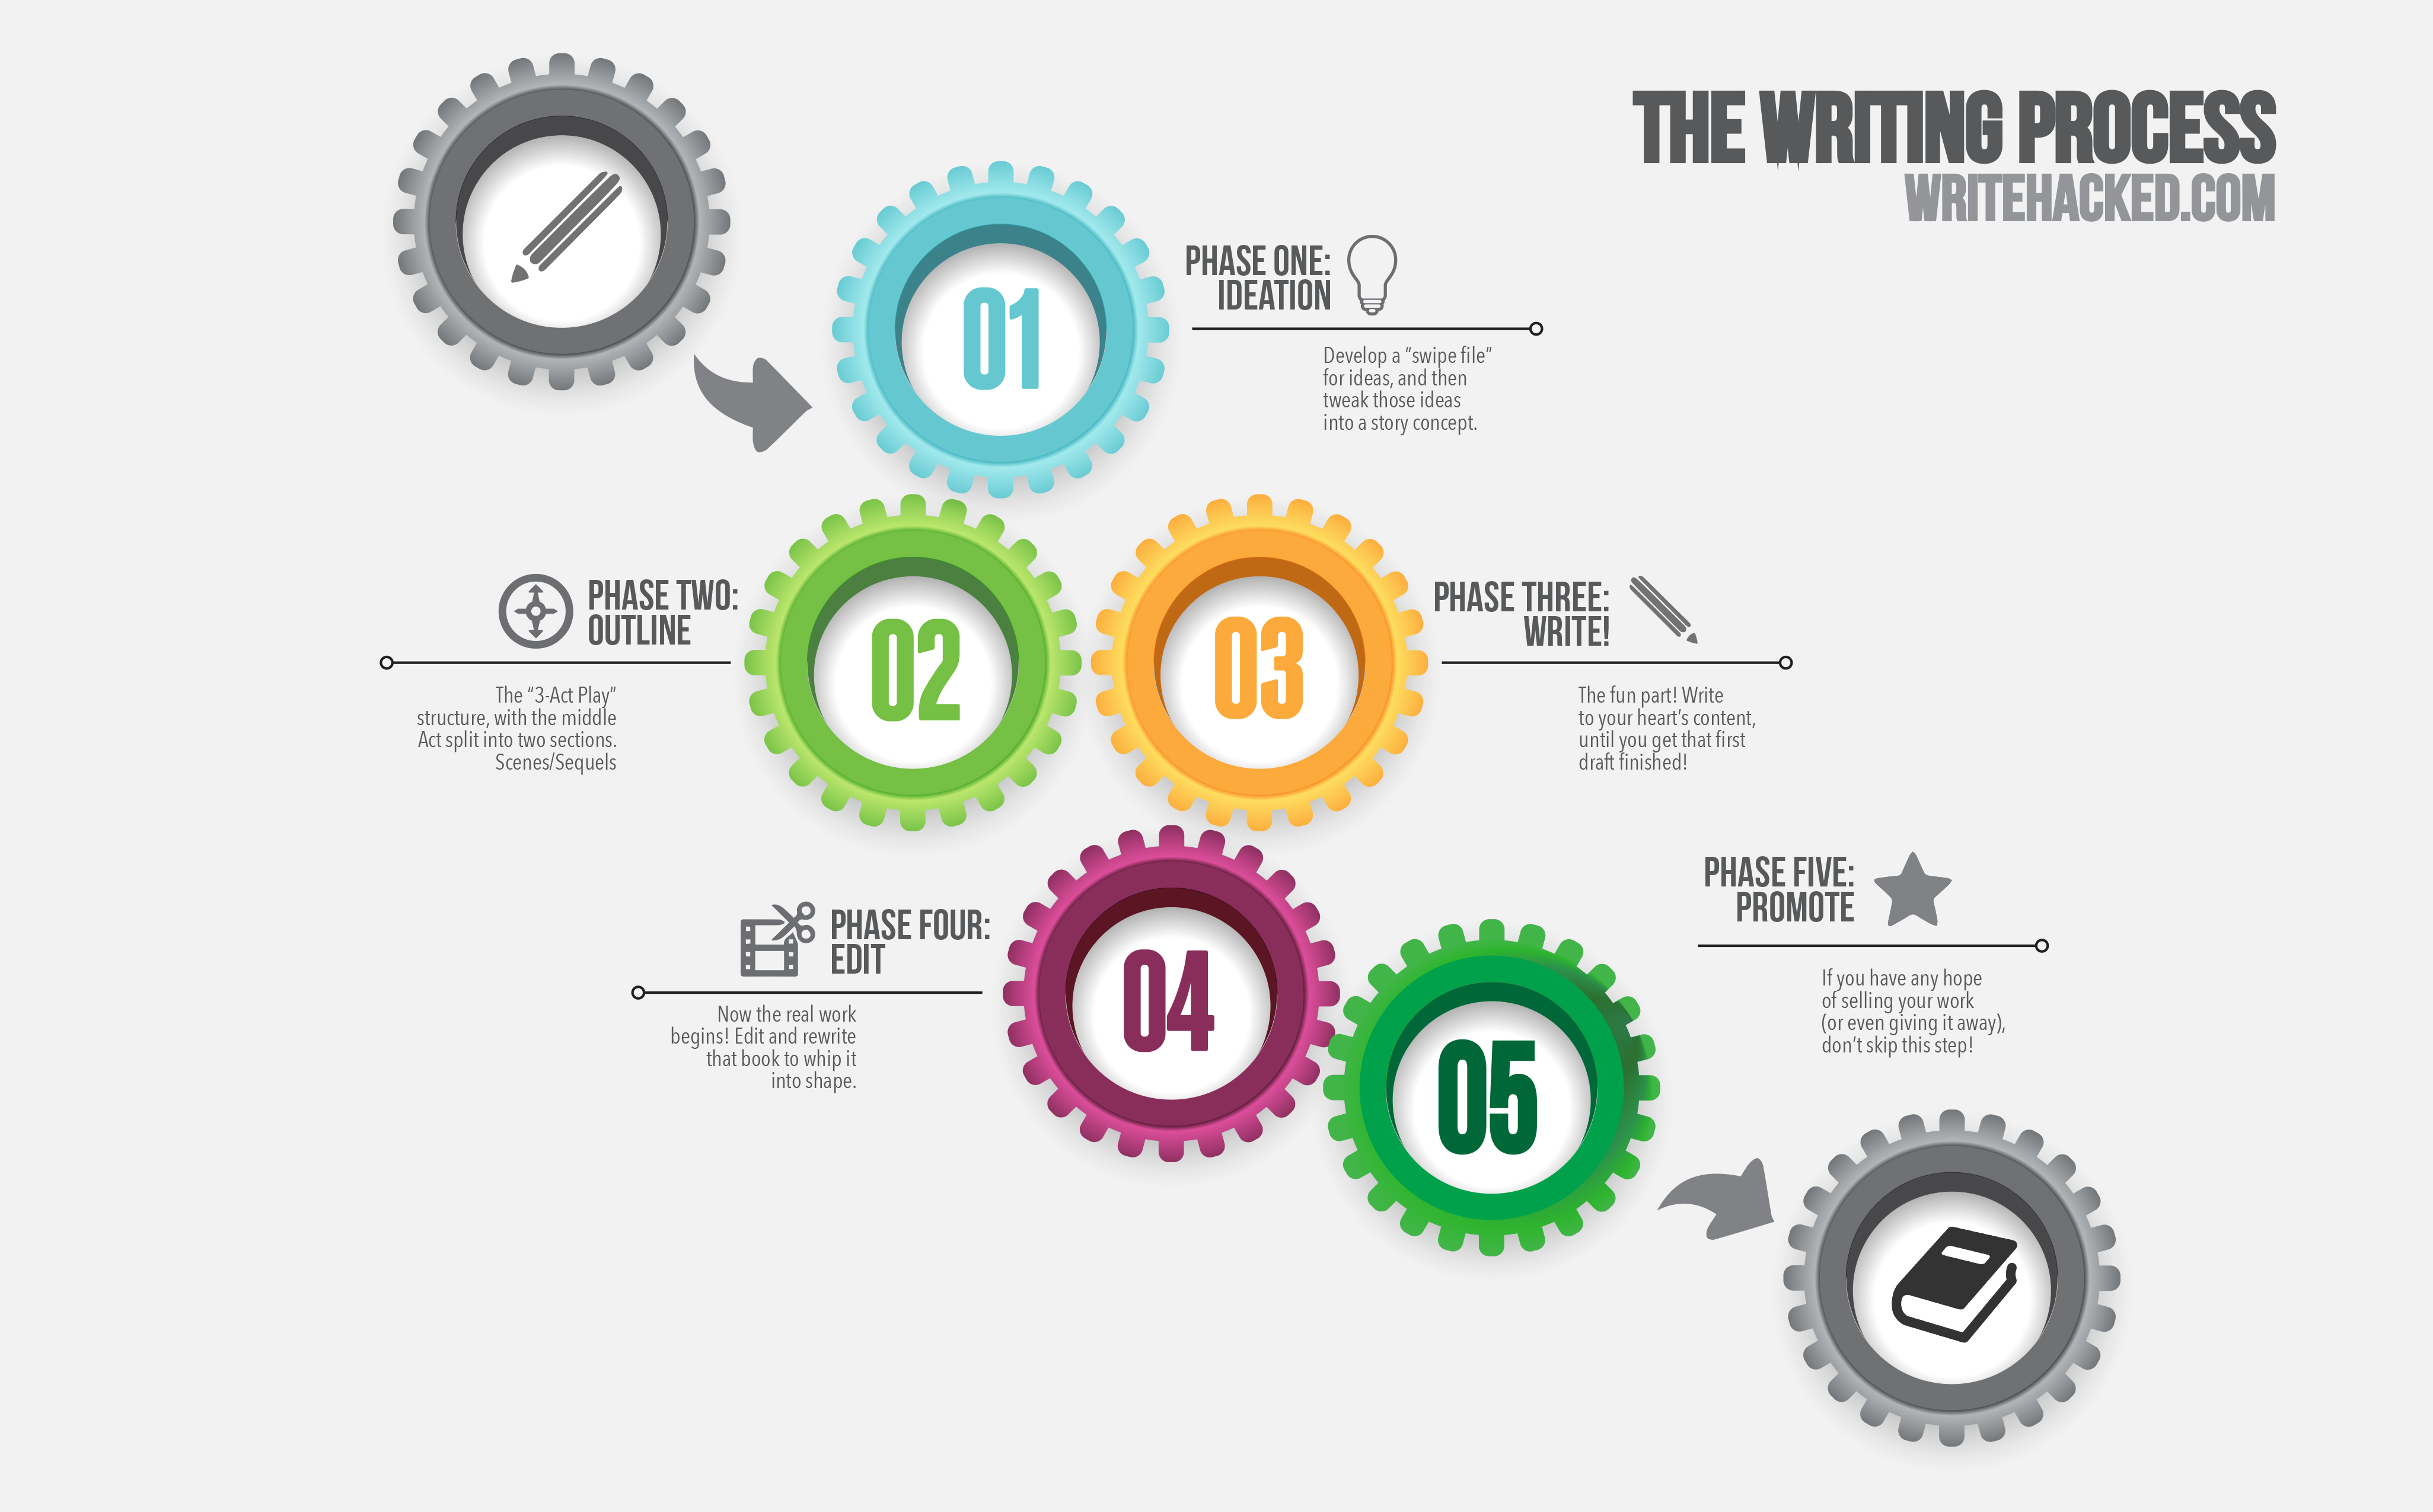
What’s a “workflow?”
A workflow is just a process to take something from the beginning to the end. It’s a step-by-step analysis of what happens when someone sits down to work.
In this case, I’m going to examine my own “writing workflow,” or the step-by-step process I use when I sit down to write a novel.
Phase One: Ideation
I teach this phase in-depth in my Udemy course, Write A Novel Now! (use the coupon code HACKYOURWRITING to get the course for only $19), but here’s a basic breakdown of the process I use to “find and generate ideas:”
1. The Swipe File
I have a “special green folder” I use to keep my idea-generators in. This is an actual, physical, folder that I found in my wife’s college box, and I stole borrowed it for my own use.
Inside, I keep things like:
- Printouts from interesting websites
- Popular Science articles
- Copies of encyclopedia articles
- Random interesting tidbits
These articles and snippets are really just cool ideas I’ve come across, and things I think might make for a decent story that I don’t want to forget about. I keep everything inside and just add to it until I’m ready to generate some story ideas.
At this point in the game, I’m not looking for a perfectly-crafted book idea, and I’m not trying to even think in terms of characters, settings, etc. What I do at this point is pull out a few articles that catch my eye, spread them out on the floor, and see if they might work together somehow.
It’s worth noting that I haven’t needed to use this folder for the last two books: The Enigma Strain and The Atlantis Deception were both books that I had thought of, almost entirely, as I was writing the previous book:
- For The Enigma Strain, I jotted down the idea as I was working on The Depths, and things sort of grew organically from there.
- For The Atlantis Deception, I was commissioned by Amazon Publishing to create a short book in the world created by A.G. Riddle, (The Origins Mystery series).
The Lucid, however, was spawned by using the above “Swipe File” method: I wanted to start a new project, and I had no idea what to write about. I grabbed my trusty “special green folder,” grabbed a chunk of articles, and spread them out in front of me on the floor.
One of the articles that drifted to the top was about introducing helpful additives to municipal water supplies (I can’t remember the exact article, otherwise I’d link it here). I remember my wife and I were watching The Walking Dead at the time, and I thought to myself:
What if I wrote a story that had a protagonist similar to Rick from The Walking Dead, and a plot that resembled Divergent and The Walking Dead, but with something affecting the water supply instead of zombies?
Eventually, the story grew into “The Walking Dead without zombies meets Divergent without the dramatic teenage romance stuff.”
And, as usual, as soon as I started writing the main character (Adam) and his family, things took a turn. The story, now in its second “episode,” is one that I’m extremely proud of, and not only because I’m enjoying the storyline: I’m co-writing this one with my friend and business partner, Kevin Tumlinson.
2. Tweak the Idea
Once I have a general idea, it’s time to turn it into a “concept.” The only difference, in my mind, is that a concept is the driving force behind a plot, while an idea is simply a grain of concept. A good idea can generate a good “what if?” question and a decent concept, but a great concept drives a story forward.
Taking my example of The Lucid above we have a protagonist (Adam), and a problem. Cool? Maybe. Story? Nope.
To make this idea into a plot-ready concept, I needed an antagonist (the person we’re rooting against, or an internal struggle Adam must go through), some goals (what does Adam want?) and some conflict (why does Adam want those things, and what gets in his way?).
What we (by now, Kevin was working on the plot with me) came up with was something like this:
Adam Bolland, a chemical engineer at the local water treatment facility, notices that many people around him, including his own family, are becoming emotionless shells of their former selves. He can’t figure out why, but he has a feeling it has something to do with a small vial of liquid that got added to the water supply. What is the liquid, and more importantly, who put it there?
That wasn’t the exact two sentences we used, but it was an early example. It was enough to finish the first “episode” of The Lucid, available now!
Phase Two: Outline
I use outlines when I write. There. I said it.
There are a lot of writers who don’t (looking at you, Mr. Tumlinson!), and that’s okay. I’ve never been able to get my mind around an entire 100,000-word manuscript without a general plan of action, so if this step isn’t for you, move on!
My outlines follow the Three-Act Play structure, with a few special plot points and scheduled “twists” thrown in (See my good friend Larry Brooks for more information about what those “plot points” should be):
- Act 1: Establish the world; introduce the protagonist
- Act 2: Establish/reveal the antagonist; protagonist runs away from the antagonist
- Act 3: Protagonist retreats, plans an attack, and chases the antagonist
- Act 4: Resolution and denouement
That’s it. (I’ll mention later why my Three-Act Play is split into four acts.)
Once I have this, I’ll fill in a few blanks using Dwight Swain’s Scene/Sequel method:
Scene:
- Goal: What does the character want?
- Conflict: What are they fighting/working against to get it?
- Disaster: What happens that sends them off course?
Sequel:
- Reaction: How do they react to the previous Scene?
- Dilemma: What are they processing?
- Decision: What do they decide is their new goal?
These simple Scene/Sequel structures are a great way to keep your characters moving toward something they find important. Obviously I’ve only scratched the surface about what each is intended for, so I’d recommend you pick up Swain’s book, Techniques of the Selling Writer to learn the whole process.
When I’m finished outlining, I like to print the entire thing on actual dead trees. I leave a large right-side margin on the page for notes, drawings, doodles, and anything else that I want to jot down as I’m reading the outline. I stick this outline (usually around 50-60 pages) into a three-ring binder so I can lay it flat on the desk in front of me.
Then…
Phase Three: Write!
This is always the phase that I’m most excited about…
…Until I start writing.
Writing is a beautiful, terrible, monster that is constantly peeking over your shoulder and forcing you back to work. At the same time, the monster’s all to easy to ignore.
For me, writing doesn’t mean “artfully combine words while sitting at the edge of my seat while the muse speaks through me.” Writing, for me at least, means “work.”
So here is my general schedule/plan of attack for writing:
1. Plan
Once I have an outline, I usually rush to get into the first draft, so I can see where the major plot holes are, but I’ve found that taking this initial leap a little slower is better. Now, I give myself a few days to plan my strategy.
Usually this is as simple as setting up my Scrivener file with the major plot points and story arcs:
 You’ll see in the graphic Scrivener’s “Binder,” found on the left side of the screen in any Scrivener document. The “Binder,” like a binder in real life, organizes and holds all of the individual files and folders that make up your book.
I use a very simple organization method, but Scrivener allows you to do virtually whatever you want: folders can hold other items, or they can have text assigned to them, or both, etc.
You’ll notice that I’ve set up this book (The Enigma Strain) in my usual way, using the Three-Act Play structure that Larry Brooks taught me. In this case, as he recommends, I’ve split the middle act (Act 2) into two halves, as the first “half” of that act is about the protagonist running away from the antagonist (generally) and second “half” of it is about the protagonist chasing the antagonist (generally).
Inside those folders are all of the chapters that make up the book. I might add a few chapters from my outline inside their designated Act folders, but for now it’s enough to know I’ve got a basic structure set up and a basic plan of action!
2. Schedule
Part of the planning process for me is setting a deadline, no matter how arbitrary it may seem. I can write to spec and a hard deadline, like I did when Amazon commissioned me to write a continuum novella for A.G. Riddle’s world (called The Atlantis Deception), but I usually don’t.
As a self-published author, that’s one of the major upsides AND downsides of releasing a book!
Deadlines keep me focused, so I use a couple low-tech options to schedule my writing time:
- iCal – my Mac’s built-in calendar that syncs across my phone and iPad, and my wife’s gadgets as well.
- Scrivener – Scrivener has a cool word count feature that can set calculate the number of words needed, per day, so you’ll hit your target deadline in time.
Both of these tactics are exciting for me, as I begin to build momentum and motivation when I imagine finishing a first draft by that date sometime in the future.
Finally, the last thing I do to prepare for a major writing project is look at my other calendars (Church, Personal/Home, Business) and see if there’s anything crazy coming up that might interfere with daily writing time.
For example, when I was writing The Enigma Strain, my Church calendar reminded me that our church staff would be traveling to Atlanta for the Orange Conference for four days.
I’m a conference fanatic, and I’d be traveling with friends, so I knew I wasn’t going to really make time to write every day (hey, at least I’m honest!). So I decided to add 1,000 words to each day the week before the trip, just in case I didn’t write anything on the plane or in the hotel.
I ended up writing about 2,000 words on the plane, so I came back from Atlanta ahead of my daily word count goal!
3. Write!
I try to write every day. I never make it more than a week.
I’ve got a kid on the way, a full-time church job, and a thousand business ideas I’m working on at any given time. But that’s no excuse — if you want to write, you have to write.
For me, I write because I can’t not write, but that doesn’t mean I have to write every day (yet). I’d love to, but rarely is finishing a book such a priority that I move other things out of the way to get it done.
That said, when I’m in “writing mode,” I’ll be able to knock out 5,000-6,000 words a day, and when I’m not, I can still pop out around 2,000 words. Those aren’t small numbers, and many professional (read: full-time) writers I’ve talked to strive to achieve the same every day.
So, if you’re a slow writer, schedule around that. Know your limits, habits, and desire to have a completed manuscript, and be honest with yourself. I used to get mad when I didn’t write one day, but I realized soon that I should only be mad at myself if I didn’t do anything productive that day. No blog post, podcast episode, work on a business idea, etc., that should make me mad.
But if I did one or more of those things and didn’t find time to write even 500 words, that’s okay.
Finally, realize that this process can and probably will change as you do. Again, I used to be able to write each and every day. When I was working on The Golden Crystal, I had a 9-5 cubicle job and would spend part of my lunch hour getting 500 words written. Saturdays and Sundays I snuck it in during morning or evening writing sessions, but I was writing every day.
As life happened, my priorities shifted: I’m still a fiction writer, but I’ve got plans in other arenas as well!
Know your strengths, set your habits, and be willing to adapt. Tweet this!
Phase Four: Rewrite/Edit/Polish
Congratulations! You’ve finished the first draft! It’s time to send out tweets to your followers, emails to your friends and family, and upload it to Kindle for the world to see…
Wait.
Nope.
It’s time to start over.
By that I mean it’s time to give the first draft a rest (stick it in a drawer or folder on your desktop for a month), then pull it back out and read it.
Trust me, this is going to hurt.
When I finished the first draft of The Golden Crystal, I’d never written any fiction, much less a 100k-word document. I thought one draft was all I needed (“Sure, other writers might need more, but me? Ha!”).
I was wrong.
When I read the “finished” copy, I was dumbstruck. How could I have missed so many words, made so many continuity errors, and lost track of the plot? I even switched a character’s name in the middle of the book!
What the hell?!?
It’s okay. Calm down, don’t panic, and breathe. This happens to everyone. I promise. Here’s what to do:
1. Rewrite
Take a red pen and a printed copy of the manuscript and just read it. Don’t try to fix things yet, but make squiggles and marks all over each page as you read. These are just telling you where the mistakes are.
Then go back again and actually fix these mistakes (you’re doing this in two passes because you’ll probably find even more mistakes this time), and note in the margins where the story falls apart, a character’s name changes (looking at you, Thacker), and so on.
Finally, rewrite the draft. (One time I actually rewrote the draft, using only my brain. No notes, no outline, no earlier draft. I trashed the draft, started from page one, and just paraphrased myself as I tried to remember where the story was supposed to go. It was a terribly pain-inducing process, but I think it produced one of the best second drafts I’ve ever written.)
Usually I just make those changes (some minor, most major) and move chapters around, add/delete a prologue, etc. Then my final pass is to remove inconsistencies, fix typos, and find those extra words that usually aren’t needed (“that,” “began to,” etc.).
This is my second draft, and at this point I’ll send it off to the editor.
2. Edit the edits
The editor I work with will usually take a few read-throughs to get acquainted with the story, making notes and marks just like I mentioned above, then she’ll send over chapter-by-chapter notes. (Every editor works differently, though, but this is our process.)
I’ll make the changes she’s requested in each chapter, sometimes canning the entire thing, then I’ll put it all back together for her to take a final pass.
When the editor’s finished, I’ll do another read-through and try to catch any leftover typos, then send it to the beta readers.
3. Beta readers
If you’re reading this because you’re subscribed to my mailing list (thanks!), you’re probably familiar with this part.
I set up a simple form that captures an email address and initiates a download of the “finished” book, then I send out a quick email telling everyone I want to give them a free book. I always ask for an honest review — I’m not interested in “fake” or “solicited” good reviews. The email links back to that form, and starts the process.
Many times I’ll get a few hundred people interested, and I collect all of their email addresses (they’re already on my list, remember), so I can send them a note a couple weeks later (“Hey, remember that book you said you’d read? How’d it go? Want to review it?” or something like that).
That whole process does two very important things:
- Gives me great feedback. Just about everyone who opts in to reading the book and actually reads it sends me initial feedback. A few people graciously send me lists of typos and mistakes. This is one of the best things about having some trusted circles, because it’s AWESOME when people want to offer free help!
- Gives me a good chunk of initial reviews. Many of these beta readers post a review on Amazon and Goodreads, or one of them. These reviews are gold, as they’re going to help me get enough reviews to run a BookBub ad, generate some social proof, and more.
If you haven’t tried a beta reading campaign for your ARCs (Advanced Reader Copies) yet, give it a shot!
Phase Five: Marketing
While marketing, in my opinion, is a crucial part of the writing process, it may not be for some. I recognize that there are people out there have absolutely no interest in marketing their work, or selling it.
That’s fine. However, I would argue that the vast majority of us do want to sell our work, even if it’s intended as a giveaway (yes, that’s still “selling.”) In that case, and for that reason, I include marketing here as one of the primary phases of writing.
That said, I don’t have time or space (this post is going past 3,000 words!) to include everything I do to market a book. I’ll give you these tips, and a link to a post that covers everything I did to market/promote The Golden Crystal:
- Marketing is only the last thing in this post, not something I do last, after I’ve written a book. I’m thinking about marketing and promotion way back when I’m coming up with ideas, and you should too.
- Marketing isn’t sleazy unless you make it that way. There are countless people out there who want to read your work and/or see what you’ve created. Find them, and gently tell them about your stuff. It really is that simple.
- Want a great, tested marketing plan, done-for-you? Here’s a link to a post (also very long) that I wrote last year, and it includes a full marketing plan template: The Official Self-Published Book Marketing Plan – WriteHacked.com (this thing has been read almost 140,000 times!)
What about you?
What is your writing process? What steps do you take to go from idea to finished, polished manuscript and then book?
I’d love to hear your thoughts — leave a comment just below this post and let me know!
Too much information. But I really appreciate your Scrivener tips.
Interesting take. Sorry for too much free information.
I’d love to take your course, but unfortunately it isn’t closed captioned, thus making it useless for those of us who are deaf or hard of hearing. Please consider having your videos captioned. You can get help doing so from Amara at http://www.amara.org . . . this would be a LOT of help for those of us who are writers, whether it be getting started out or already published.
I’m always interested in the processes of other writers, so thanks for taking the time to write this out with all of its links and additional routes for investigation. I found a lot of helpful tips. I’m in the process of finishing my first draft, so I don’t really have my own beginning-to-end process yet. Congrats on the baby!
Thanks Nancy! Glad it helped!
Hello my loved one! I wish to say that this post is awesome, great written and include almost all important infos. I would like to look more posts like this .
Have you ever considered about including a little bit more than just your articles? I mean, what you say is important and everything. But just imagine if you added some great photos or video clips to give your posts more, “pop”! Your content is excellent but with pics and video clips, this blog could undeniably be one of the best in its niche. Good blog!